Bring MVVM To Your Android Application With Data Binding Library

Google I/O 2015 has come and gone now, only leaving in its tracks one developer tool that really gets me excited.

We saw an array of nice incremental improvements announced. Like Android M and its various user-centric features, NDK (C/C++) support in Android Studio (if you’re into that kinda thing), image generation from vector files, heap analysis, improved theme and layout editors, Gradle performance improvements, etc. I am pleased we finally have a Design Support Library so we can implement the Material Design UI patterns we’ve been guided toward for about a year now. But most of these things were already being done in one form or another by leveraging community tools and libraries.

One thing however that the community’s been craving, but hasn’t come to a good set of patterns or tools on, is how to improve the code that coordinates between the model and the views inside our projects. Until now, Activities and Fragments have typically contained a ton of fragile, untestable and uninteresting code to work with views. But that all changes with the Data Binding Library.

Goals and Benefits

We should all be interested in this library because it will allow us to be more declarative in the way we work with our views. Going declarative should help remove a lot of the code that’s not very fun to write, and along with it, a lot of pesky UI orchestration bugs that result. Less code means less bugs, right? Right.

Another big goal of mine and something the community needs, is lower friction unit testing for our view and application logic. It’s always been possible to have tests here, but it’s been so hard and required so much additional work that a lot of us (not me of course) just skip right over them. This is our opportunity to do better.

MVVM

In the official docs for this library, they give you an example of directly binding a domain entity properties from User to attributes in the layout. And they give you the idea that you can do fancy things like this:


    android:visibility="@{age < 13 ? View.GONE : View.VISIBLE}"

But let’s be really clear here: I don’t recommend binding directly to domain entities or putting logic into those bindings in the layout file. If you do either of those things, it will make it harder to test your view logic and harder to debug. What we’re after is the opposite: easier to test and debug.

That’s where the MVVM pattern comes into the picture. To over-simplify things, this will decouple our Views from the Model by introducing a ViewModel layer in between that binds to the View and reacts to events. This ViewModel will be a POJO and contain all the logic for our view, making it easy to test and debug. With this pattern, the binding will only be a one-to-one mapping from the result of a ViewModel method into the setter of that View property. Again, this makes testing and debugging our view logic easy and possible inside of a JUnit test.

Project Setup

Let’s get to it then. NOTE: I’ll probably skip over some useful information here in the interest of brevity, so I recommend referencing the official docs.

Start off by adding these dependencies to your project’s build.gradle:


    classpath 'com.android.databinding:dataBinder:1.0-rc4'
    classpath 'com.neenbedankt.gradle.plugins:android-apt:1.8'

These dependencies must be added to project level build.gradle complete file content:


// Top-level build file where you can add configuration options common to all sub-projects/modules.
buildscript {
    repositories {
        jcenter()
        mavenCentral()
    }
    dependencies {
        classpath 'com.android.tools.build:gradle:1.5.0-beta2'
        classpath 'com.android.databinding:dataBinder:1.0-rc4'
        classpath 'com.neenbedankt.gradle.plugins:android-apt:1.8'

        // NOTE: Do not place your application dependencies here; they belong
        // in the individual module build.gradle files
    }
}

allprojects {
    repositories {
        jcenter()
        mavenCentral()
    }
}

And then add this to your app module’s build.gradle:


    apply plugin: 'com.android.application'
    apply plugin: 'com.android.databinding'
    apply plugin: 'com.neenbedankt.android-apt'

    dependencies {
        apt 'com.android.databinding:compiler:1.0-rc4'
    }

NOTE: if you have any provided dependencies like dagger-compiler, you will now need to change the provided keyword to apt to prevent them from being added to your classpath and if you’r using kotlin like me you need to change apt to kapt as follow:


dependencies {
    compile fileTree(dir: 'libs', include: ['*.jar','*.so'])
    compile 'com.android.support:design:23.1.0'
    compile 'com.android.support:appcompat-v7:23.1.0'
    compile 'com.android.support:cardview-v7:23.1.0'
    compile 'com.android.support:recyclerview-v7:23.1.0'
    compile 'com.android.support:support-v4:23.1.0'
    compile 'com.google.code.findbugs:jsr305:1.3.9'
    compile 'eu.chainfire:libsuperuser:1.0.0.+'
    compile 'io.reactivex:rxandroid:1.0.1'
    compile 'io.reactivex:rxjava:1.0.16'
    compile "org.jetbrains.kotlin:kotlin-stdlib:$kotlin_version"
    compile 'com.android.support:support-annotations:23.1.0'
    // Dagger 2
    compile 'com.google.dagger:dagger:2.0.2'
    compile 'javax.inject:javax.inject:1'
    compile 'javax.annotation:javax.annotation-api:1.2'
    apt 'com.google.dagger:dagger-compiler:2.0.2'
    provided "com.google.dagger:dagger-compiler:2.0.2"
    provided 'javax.annotation:jsr250-api:1.0'
    provided 'org.glassfish:javax.annotation:10.0-b28'

    // Data Binding
    kapt 'com.android.databinding:compiler:1.0-rc4'
}

kapt {
    generateStubs = true
}

The official docs don’t mention android-apt anywhere, but you will want it. The android-apt plugin will make Android Studio aware of classes generated during the build process. This becomes crucial when trying to debug issues and learn more about how the binding mechanism works.

Binding Setup

The mechanism by which your View will receive it’s initial values and updates, and by which your ViewModel will handle events from the View, is through bindings. The Data Binding Library will automatically generate a binding class that will do all most of the hard work for you. Let’s look at the pieces required for this binding to occur.

Variable Declarations

In your layout files, you will need to add a new top level layout wrapper element around your existing layout structure. The first element inside of this will be a data element which will contain the types you will be working with in your layout bindings.


<?xml version="1.0" encoding="utf-8"?>
<layout xmlns:android="http://schemas.android.com/apk/res/android"
    xmlns:app="http://schemas.android.com/apk/res-auto">
    <data class="FragmentCustomerBinding">
        <variable name="viewModel" type="com.example.viewmodels.CustomerViewModel" />
    </data>
    ...
    <!-- the rest of your original layout here -->
</layout>

Here, we declared a viewModel variable that we will later set to a specific instance inside our Fragment.

Binding Declarations

We can now use this viewModel variable to do lots of interesting things by binding its properties to our layout widget attributes.


<EditText
    android:layout_width="match_parent"
    android:layout_height="wrap_content"
    android:hint="@string/customer_name"
    android:inputType="textCapWords"
    android:text="@{viewModel.customerName}"
    app:enabled="@{viewModel.primaryInfoEnabled}"
    app:error="@{viewModel.nameError}"
    app:addTextChangedListener="@{viewModel.nameWatcher}"
    app:onFocusChangeListener="@{viewModel.nameFocusListener}" />

Here, we’re binding the text value, enabled state, error message, a text changed listener and a focus change listener.

NOTE: the android namespace can be used for any standard xml attribute on a view, but the app namespace must be used to map to setters that do not have a corresponding xml attribute. Also, using the app namespace instead of android for standard attributes seems to remove error highlighting in the IDE.

WARNING: due to the order in which the binding code is generated, you will want to use the android namespace for the text attribute to prevent ordering issues inside the generated binding code. Otherwise, the setText() will happen after the setError() and clear the error.

ViewModel Implementation

Now, let’s look at the corresponding methods on the ViewModel that will be bound to the view properties. The ViewModel extends BaseObservable (it doesn’t have to, but it saves you a lot of work), exposes public methods whose name matches the name in the layout binding and the return type matches the type expected by the view setter method being bound to.


public class CustomerViewModel extends BaseObservable {

    public String getCustomerName() {
        return customer.getName();
    }

    public boolean isPrimaryInfoEnabled() {
        return editMode && !customer.isVerified();
    }

    @Bindable
    public String getNameError() {
        if (customer.getName().isEmpty()) {
            return "Must enter a customer name";
        }
        return null;
    }

    public TextWatcher getNameWatcher() {
        return new SimpleTextWatcher() {
            @Override
            public void onTextChanged(String text) {
                customer.setName(text);
            }
        };
    }

    public EditText.OnFocusChangeListener getNameFocusListener() {
        return (v, hasFocus) -> {
            if (!hasFocus) notifyPropertyChanged(BR.nameError);
        };
    }
}

The first method is just doing a simple delegation to a domain entity to get the return value. The second and third are performing some logic to determine the return value. The rest are returning watchers or listeners to react to changes in the view. The great thing here is that this EditText will automatically get populated with the value from the ViewModel, show an error if it doesn’t pass validation rules and send updates back to the ViewModel as things change.

Notifications

Notice in the validate() method above, the listener calls notifyPropertyChanged(…). This will trigger the view to rebind the property and potentially show an error if one is then returned. The BR class is generated for you, much like the R file, to allow you to reference bindable properties in code. This granular notification isn’t possible unless you annotate the property with @Bindable. Since we only specified the viewModel variable in the layout, it’s the only “bindable” value it creates by default.

You can also trigger the view to rebind all of its properties by using the more generic notifyChange() method.

Be careful here. You can get into situations where you have a TextWatcher that calls notifyChange() which causes the text to be rebound, which triggers the TextWatcher, which causes a notifyChange() , which… you see where this is going?

It seems like best practices here will be one of the following:

  • Short circuit the notification cycle by checking to see if the value actually changed before notifying.
  • Avoid notifying the views that changed inside their own change listeners. If other views need to be notified in this situation, you will need to bind and notify at a more granular level.

Bringing it all together

So far we’ve set up the declarative pieces that will all react to each other and do the right thing. The only thing left is to bootstrap the bind mechanism. This will happen inside your Activity or Fragment. Since I use Fragments for all my views, I’ll show what that looks like.


    FragmentCustomerBinding binding = FragmentCustomerBinding.bind(view);
    CustomerViewModel viewModel = new CustomerViewModel();
    binding.setViewModel(viewModel);

Taking it further

We looked at the basic building blocks of creating a UI that reacts to changes in the ViewModel as they are changing. Since you aren’t on the hook for writing the code that updates the UI, you can spend your time creating:

  • Buttons that enable/disable based on the validity of the ViewModel
  • Loading indicators that show/hide based on work being done in the ViewModel
  • Unit tests that exercise every aspect of your view’s logic

Limitations

There are still some things that don’t seem to be handled well in this new binding world. For example, you can’t easily bind an ActionBar to a ViewModel. (Maybe forgoing the old ActionBar interface and just using a Toolbar directly could help?)

You will also need to delegate back to the Activity for framework-specific things that require the Activity Context. (Which is a lot!) You could inject interface implementations into your ViewModels or set the Activity/Fragment as a listener on your ViewModel, or just use the ViewModel inside the fragment and call methods on it. Either way, you can still use a ViewModel to house all your view logic and delegate out as needed.

Just think of the Fragment now as the place where you have to write your manual binding code – which is what it always was before, except now with all the time you save not writing most of that code, you can spend on the writing automated tests for your ViewModel!

What’s Missing

This library works very well but is still in beta, and you can tell when you use it. I look forward to seeing it mature and provide a better developer experience. Some of the things I look forward to seeing:

  • CTRL+B navigation from method in Layout to the method in the ViewModel
  • Clearer error messages when something goes wrong
  • Auto complete and type checking inside the layout file
  • Reduced boilerplate by combining standard two-way binding functionality
  • Binding support for going from collections to AdapterViews
Introducing ASP.NET MVC 6

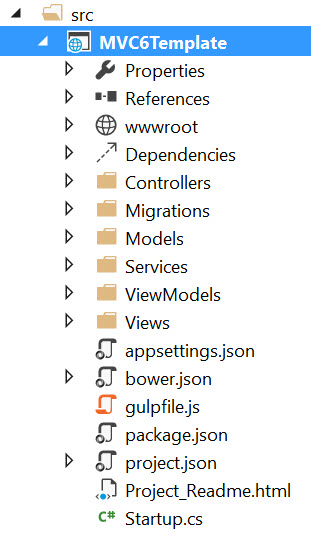
ASP.NET MVC 6 is a ground up rewrite of the popular .NET web platform. Sweeping changes were made throughout, with even some of the most basic elements being reorganized. These changes are immediately apparent when starting a new MVC6 project, especially to developers familiar with previous versions of the framework.

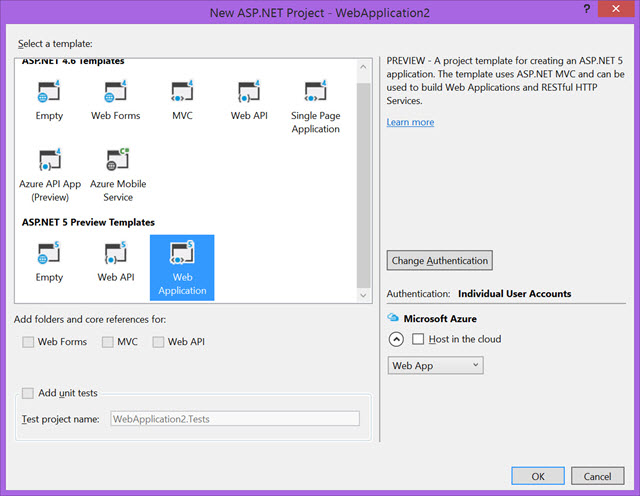
Let’s hit “file new project” and take a tour of the new MVC6 project template. We’ll look at what’s missing from MVC5, what we can expect to stay the same, and what’s new.

What’s missing

Before beginning work on a new project it’s important to understand where some familiar items have gone. Considering that MVC6 is a complete rewrite, some changes should be expected, however there are some key players missing that might come as a surprise.


All items in this list that have a replacement counterpart will be explained in detail under the “What’s new” section.


  • App_Start : The App_Start folder previously contained various startup processes and settings such as configuration, identity, and routing. These items have been replaced by the Startup.cs class which is now responsible for all app startup tasks.
  • App_data : The App_data folder once held application data such as local database files and log files. The folder isn’t included in this release but it can be added back and used. If you choose to use the app_data folder, proceed with caution so as to not make files publicly available by accident.
  • Global.ASAX : The Global.ASAX is no longer needed since it was yet another place for startup routines. Instead all startup functionality has been placed in Startup.cs.
  • Web.Config : It may come as a surprise that the root Web.Config file is gone from MVC. The Web.Config was once the XML equivalent to a settings junk drawer, now all application settings are found in config.json. Note: A Web.Config can still be found in MVC for configuring static application resources.
  • Scripts : The scripts directory used to house the application’s JavaScript files has been given a new home. All JavaScript files now reside under wwwroot/js as a static resource.
  • Content : Much like the aforementioned Scripts folder, static site resources can be found under wwwroot.

What’s the same

Very few things remain unchanged in the MVC6 project template. In fact the only three items that really stayed the same are the fundamental components of the MVC pattern itself: Models, Views and Controllers.

  • Models : The models folder remains with a minor change. The Models folder will now contain data Models only.
  • Views : Views in MVC6 are as they were in previous versions, they are dynamic HTML (or .cshtml) rendered on the server before being sent to the client. Views contain the application UI and are by default built with Bootstrap. One new addition to the views folder is the _ViewImports.cshtml. The _ViewImports file provides namespaces which can be used by all other views. In previous MVC projects, this functionality was the responsibility of the web.config file in the Views folder. However, the web.config no longer exists and global namespaces are now provided by _ViewImports.
  • ViewModels : The ViewModels folder was added to differentiate between models used for data and models used specifically for View data. This addition helps promote separation of concerns within the application.
  • Controllers : In MVC6 the controllers folder retains its responsibility to hold application controllers. Controllers were commonly used to return views, but can serve as Web API endpoints now that Web API and MVC have merged. In MVC6, both MVC controllers and Web API controllers use the same routes and Controller base class.

What’s new

At first glance, it’s apparent that there’s a lot of new parts to an MVC project. From the root folder down there are many new files and folders that come with all new conventions. Let’s explore the new items and understand their purpose in the project.

  • src : The absolute root folder of the project is the src (source) folder. This folder is used to identify the source code of the project. It was added in this version of .NET to match a convention commonly found in open source projects, including many popular ones on GitHub.
  • wwwroot : The wwwroot folder is used by the host to serve static resources. Sub-folders include js (JavaScript), CSS, Images and lib. The lib folder contains third party JavaScript libraries that were added via the Bower package manager.
  • Dependencies : More package management options are available in MVC 6. Bower and NPM support has been added in this version. Configuration for both Bower and NPM can be managed via the GUI here. Additionally, configuration can be managed by their respective .json files found in the root src folder.
  • Migrations : MVC 6 ships with Entity Framework 7 (EF7) which no longer supports EDMX database modeling. Because EF7 is focused on code first, the migrations folder is where you’ll find database creation, initialization, and migration code.
  • Services : Services are at the forefront of MVC 6. Since MVC 6 was built with dependency injection at it’s core, services can easily be instantiated by the framework and used throughout the application.
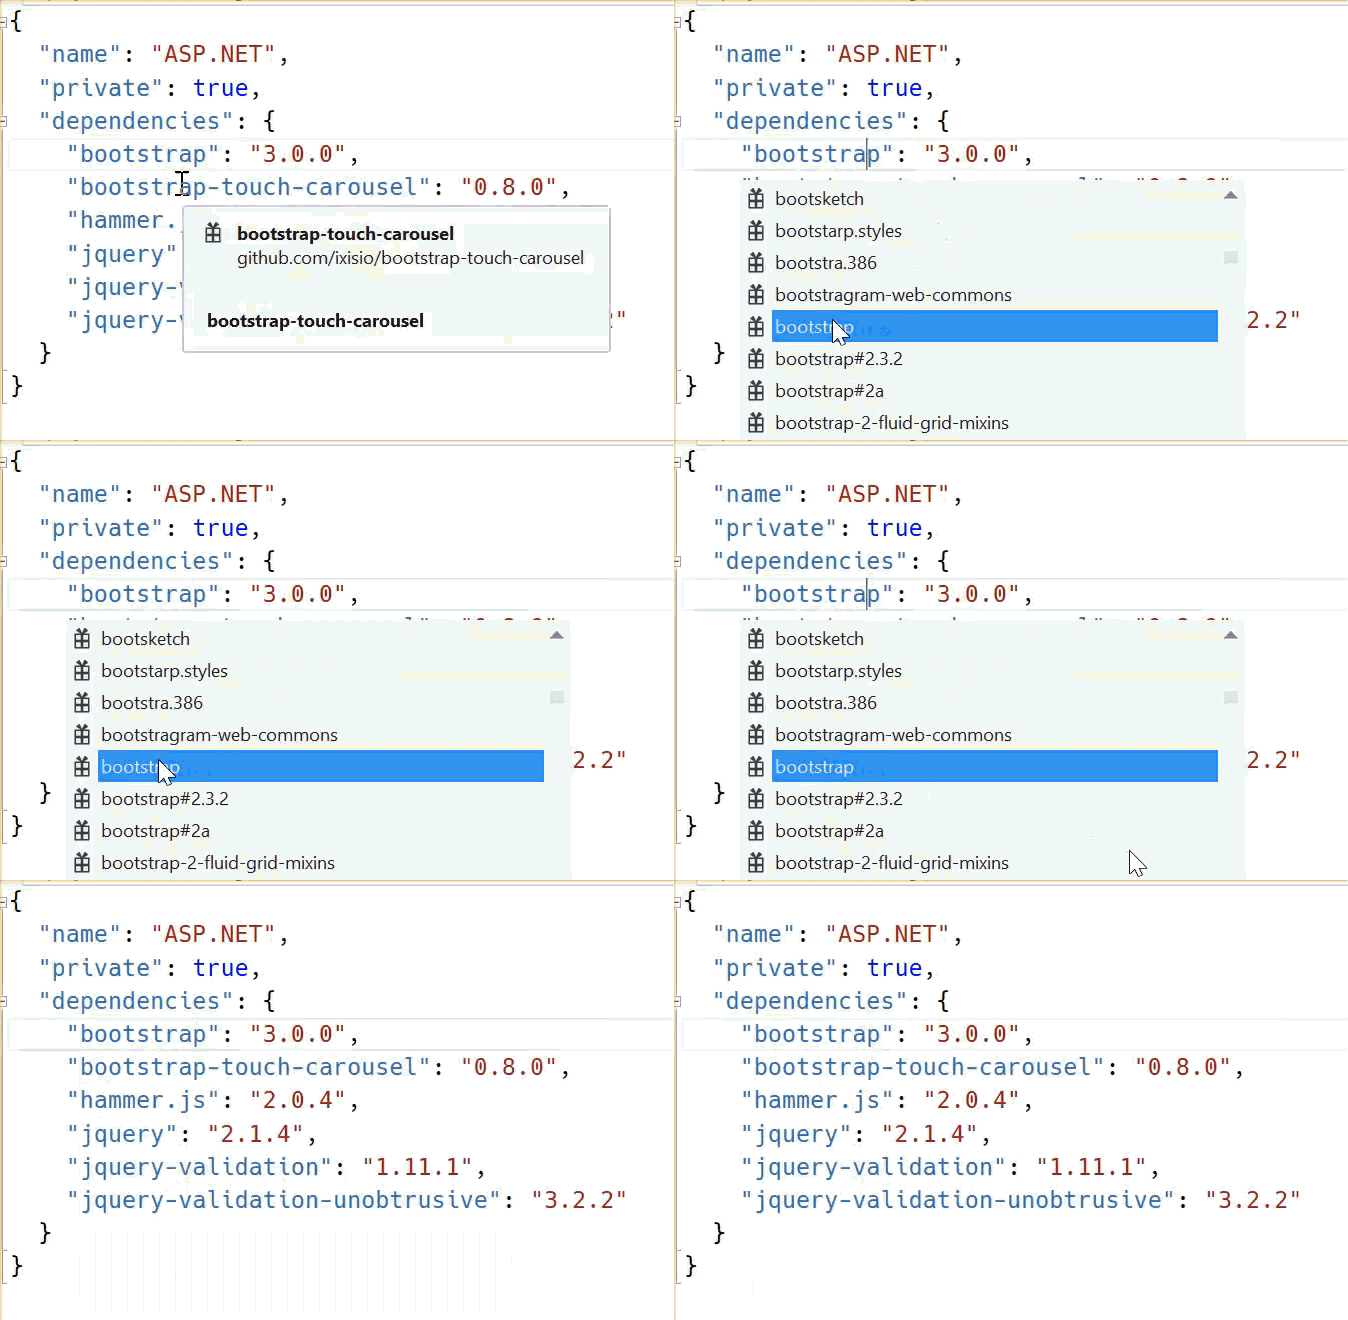
  • bower.json & package.json : To support “all things web,” MVC 6 has added first class support for Bower and NPM. These popular package management systems were born from the web and open source development communities. Bower hosts popular packages like Bootstrap while NPM brings in dependencies like Gulp. The bower.json and package.json files are used to register and install Bower and NPM packages with full Intellisense support.
  • gulpfile.js : Gulp is another tool built “for the web, by the web.” It is given first class support in MVC 6. Gulp is a Node.js-based task runner that has many plug-ins available from NPM. There are packages for compiling, minifying and bundling CSS. There are also packages for .NET developers for invoking MSBuild, NuGet, NUnit and more. gulpfile.js is where Gulp tasks are defined for the application.
  • hosting.ini : ASP.NET 5 is designed with a pluggable server layer, removing the hard dependency on IIS. The hosting.ini file is mainly used for configuring WebListener for hosting without IIS & IIS Express.
  • project.json : The project.json file is used to describe the application and its .NET dependencies. Unlike prior versions of MVC, .NET dependencies for your application can be added and removed using the project.json file. These dependencies are resolved through NuGet and full Intellisense is enabled within the file. This means that you can begin typing the desired NuGet package name and suggestions will appear on-the-fly. Cross platform compilation and build scripts are also configured here.
  • startup.cs : In previous versions, MVC application startup was handled in App_Start and Global.asax. With ASP.NET 5, startup is handled in Startup.cs. The Startup method is the first method in the application to run and is only run once. During startup the application’s configuration is read, dependencies are resolved and injected, and routes are created.

Wrapping up

The MVC6 project template embraces the web in many ways. From the root folder and below, most of the project structure has changed to align with the ever changing web. The inclusion of NPM and Bower in addition to NuGet provide developers with a wide range of options for bringing modular components to their application. The standardization on the JSON format for configuration further aligns with web methodologies. While many things have changed in the project template, the core MVC components have remained.

“File new project” may be a bit intimidating at first, but knowing where to find each piece and its purpose will give you a head start.

Experiencing Windows 10 Face Detection Api

I started to go through the new API’s in Windows 10 and I decided to play a little with the FaceDetector. It took me almost a half an hour to get it to work because I wasn’t able to find any samples, so I’ll share with you how I got it to work and what issues you may encounter.

I’ll just show you something simple. The FaceDetector class has a method called DetectFacesAsync, which returns a list of detected faces in a SoftwareBitmap . Our task will be to get the number of faces in a picture. Here are the basic steps:

  • Get an image
  • Create a SoftwareBitmap from that image
  • Use the method DetectFacesAsync to get the list of faces in the SoftwareBitmap

I’ll try to keep things as simple as possible, so in order to get an image we’ll just load one from the web. I found a picture on Wikipedia with a guy that makes different faces and I think it’s perfect for our demo because we can see how many of those faces it detects.

The first step will be to download the image, and I’ll do this in the Loaded event of the page.


private static async Task DetectFaces()
{
    var path = "https://upload.wikimedia.org/wikipedia/commons/c/c4/Different_faces_of_a_man.jpg";
    HttpClient client = new HttpClient();
    var bytes = await client.GetByteArrayAsync(new Uri(path));
}

Now that we have our image, it’s time to create a SoftwareBitmap from it. This part was a little tricky but after some digging I found out that I need a BitmapDecoder to create the SoftwareBitmap. Here’s how you do this:


var stream = bytes.AsBuffer().AsStream();
var decoder = await BitmapDecoder.CreateAsync(BitmapDecoder.JpegDecoderId, stream.AsRandomAccessStream());
var softwareBitmap = await decoder.GetSoftwareBitmapAsync();

The decoder needs a random access stream, which we can get from the bytes of the image, and then we use the method GetSoftwareBitmapAsync. After we get our SoftwareBitmap it’s time to create an instance of the FaceDetector class. This class doesn’t have a public ctor, so we will use the static method FaceDetector.CreateAsync() to get an instance of it.

One other issue that I had with this was that I got exceptions when I was using the

DetectFacesAsync()

method. The reason was that FaceDetector supports different bitmap pixel formats from device to device, so the SoftwareBitmap that we provide has to have a pixel format supported by our FaceDetector. Fortunately we can see which formats it supports and convert our SoftwareBitmap to one of them. The FaceDetector class has a static method called

FaceDetector.GetSupportedBitmapPixelFormats()

which returns a list of supported formats. Here’s the full code of the method:


private static async Task DetectFaces()
{
    var path = "https://upload.wikimedia.org/wikipedia/commons/c/c4/Different_faces_of_a_man.jpg";
    HttpClient client = new HttpClient();
    var bytes = await client.GetByteArrayAsync(new Uri(path));
    var stream = bytes.AsBuffer().AsStream();

    var decoder = await BitmapDecoder.CreateAsync(BitmapDecoder.JpegDecoderId, stream.AsRandomAccessStream());
    var softwareBitmap = await decoder.GetSoftwareBitmapAsync();

    var detector = await Windows.Media.FaceAnalysis.FaceDetector.CreateAsync();
    var supportedBitmapPixelFormats = Windows.Media.FaceAnalysis.FaceDetector.GetSupportedBitmapPixelFormats();
    var convertedBitmap = SoftwareBitmap.Convert(softwareBitmap, supportedBitmapPixelFormats.First());

    var detectedFaces = await detector.DetectFacesAsync(convertedBitmap);
    await new MessageDialog("The image has " + detectedFaces.Count + " faces").ShowAsync();
}

You can see that I’m getting a list of supported bitmap pixel formats and I’m using the first one to get a converted SoftwareBitmap. My device apparently supports two formats called Nv12 and Gray8. I noticed that if I used the first one, the face detector finds 36 faces, but if I use the second one it finds only 33. Finally, I use the DetectFacesAsync to get the list of detected faces and then I just show a MessageDialog with the number.

Run node.js On Older Android Device

TL;DR node.js crashes when ran on Android API level 15 and below due to libuv use of pthread_sigmask which is broken on older versions of Android. If libuv is patched with the fix for that function everything works fine.

As part of the journey to try and run node.js everywhere, I’ve recently came across an interesting issue of running node.js on Android devices with API level 15 and below. (Or, Android versions 4.0.4 and below, which apperently account for more than 10% of Android’s market share).

The ability to build and run node.js on the Android platform has been around for quite some time now, and given the node.js source code, a Linux machine and an NDK copy, it should be pretty straight forward.

However, when trying to run node.js on older Android devices, it seems to immediately crash with the following cryptic error message:


    I/DEBUG﹕ signal 11 (SIGSEGV), code 1 (SEGV_MAPERR), fault addr deadbaad
    I/DEBUG﹕ r0 deadbaad  r1 00000001  r2 40000000  r3 00000000
    I/DEBUG﹕ r4 00000000  r5 00000027  r6 0000000a  r7 4aae8bf8
    I/DEBUG﹕ r8 00000004  r9 00000003  10 0000004d  fp 4b51c964
    I/DEBUG﹕ ip ffffffff  sp 4b51c930  lr 4001f121  pc 4001b880  cpsr 60000030
    I/DEBUG﹕ d0  0000000000000000  d1  0000000000000000
    I/DEBUG﹕ d2  0000000000000000  d3  4370000043708000
    I/DEBUG﹕ d4  0000000041c00000  d5  3f80000000000000
    I/DEBUG﹕ d6  0000000000000000  d7  0000000000000000
    I/DEBUG﹕ d8  0000000000000000  d9  0000000000000000
    I/DEBUG﹕ d10 0000000000000000  d11 0000000000000000
    I/DEBUG﹕ d12 0000000000000000  d13 0000000000000000
    I/DEBUG﹕ d14 0000000000000000  d15 0000000000000000
    I/DEBUG﹕ scr 60000012
    I/DEBUG﹕ #00  pc 00017880  /system/lib/libc.so
    I/DEBUG﹕ #01  lr 4001f121  /system/lib/libc.so
    I/DEBUG﹕ code around pc:
    I/DEBUG﹕ 4001b860 4623b15c 2c006824 e026d1fb b12368db
    I/DEBUG﹕ 4001b870 21014a17 6011447a 48124798 24002527
    I/DEBUG﹕ 4001b880 f7f47005 2106ee60 eeeef7f5 460aa901
    I/DEBUG﹕ 4001b890 f04f2006 94015380 94029303 eab8f7f5
    I/DEBUG﹕ 4001b8a0 4622a905 f7f52002 f7f4eac2 2106ee4c
    I/DEBUG﹕ code around lr:
    I/DEBUG﹕ 4001f100 41f0e92d 46804c0c 447c2600 68a56824
    I/DEBUG﹕ 4001f110 e0076867 300cf9b5 dd022b00 47c04628
    I/DEBUG﹕ 4001f120 35544306 37fff117 6824d5f4 d1ee2c00
    I/DEBUG﹕ 4001f130 e8bd4630 bf0081f0 000283da 41f0e92d
    I/DEBUG﹕ 4001f140 fb01b086 9004f602 461f4815 4615460c
    I/DEBUG﹕ stack:
    I/DEBUG﹕ 4b51c8f0  002d8448
    I/DEBUG﹕ 4b51c8f4  4004c568
    I/DEBUG﹕ 4b51c8f8  000000d0
    I/DEBUG﹕ 4b51c8fc  4004c5a8
    I/DEBUG﹕ 4b51c900  4004770c
    I/DEBUG﹕ 4b51c904  4004c85c
    I/DEBUG﹕ 4b51c908  00000000
    I/DEBUG﹕ 4b51c90c  4001f121  /system/lib/libc.so

Unfortunately, the log doesn’t seem to give any information on the source of the error, just a reference to the standard c library (libc) and there’s not a lot we can do with it.
In such cases, there are basically 2 things I try to do:

  1. Try to debug the thing
  2. Add logs everywhere

Since node.js’s source code is pretty big, the first option seemed more promising.
It took some twisting and turning, but after 1-2 days, I was able to make ndk-gdb work with node.js on android, which means that I can now set breakpoints, and inspect local variable values, among other things.

There is plenty of documentation out there on how to get ndk-gdb working,so we’re not gonna spend any time on this part, but the main advice I can tell you about running ndk-gsb is that you should pay close attention carefully to its error messages and don’t be afraid to change the script in order to make it specifically work for your app.

After spending some time on setting up some breakpoints in various code paths in node, I was able to narrow down the source of the SIGSEGV signal to line 103 in libuv’s signal.c:


.....
static void uv__signal_block_and_lock(sigset_t* saved_sigmask) {
    sigset_t new_mask;
    if (sigfillset(&new_mask))
        abort();
    if (pthread_sigmask(SIG_SETMASK, &new_mask, saved_sigmask))
        abort();  // line 103
    if (uv__signal_lock())
        abort();
}
....

After inspecting the return value of the call to pthread_sigmask it seems that it always fails with the return value of 22, or EINVAL, which causes the 2nd if clause to call abort, which results with the SIGSEGV we were seeing earlier.

Some more digging up, and apparently, pthread_sigmask not working on Android API <=15 is a known issue!

Looking at the change set that fixed this issue for API level 16, it seems like it’s a rather small change that we can try and incorporate into libuv’s signal.c.

We start by adding the fix from the android source base above and a new pthread_sigmask_patched method in which we will first try to call to the system’s pthread_sigmask function, and if it fails with an EINVAL, we’ll try to call the fixed pthread_sigmask version.


/* signal.c code here... */
// --- Start of Android platform fix --
/* Despite the fact that our kernel headers define sigset_t explicitly
 * as a 32-bit integer, the kernel system call really expects a 64-bit
 * bitmap for the signal set, or more exactly an array of two-32-bit
 * values (see $KERNEL/arch/$ARCH/include/asm/signal.h for details).
 *
 * Unfortunately, we cannot fix the sigset_t definition without breaking
 * the C library ABI, so perform a little runtime translation here.
*/
typedef union {
    sigset_t   bionic;
    uint32_t   kernel[2];
} kernel_sigset_t;
/* this is a private syscall stub */
extern int __rt_sigprocmask(int, const kernel_sigset_t *, kernel_sigset_t *, size_t);
int pthread_sigmask_android16(int how, const sigset_t *set, sigset_t *oset)
{
    int ret, old_errno = errno;
    /* We must convert *set into a kernel_sigset_t */
    kernel_sigset_t  in_set, *in_set_ptr;
    kernel_sigset_t  out_set;
    in_set.kernel[0]  = in_set.kernel[1]  =  0;
    out_set.kernel[0] = out_set.kernel[1] = 0;
    /* 'in_set_ptr' is the second parameter to __rt_sigprocmask. It must be NULL
        * if 'set' is NULL to ensure correct semantics (which in this case would
        * be to ignore 'how' and return the current signal set into 'oset'.
    */
    if (set == NULL) {
        in_set_ptr = NULL;
    } else {
        in_set.bionic = *set;
        in_set_ptr = &in_set;
    }
    ret = __rt_sigprocmask(how, in_set_ptr, &out_set, sizeof(kernel_sigset_t));
    if (ret < 0)
        ret = errno;
    if (oset)
        *oset = out_set.bionic;
    errno = old_errno;
    return ret;
}
// --- End of Android platform fix --
// first try to call pthread_sigmask, in case of failure try again with the API 16 fix
int pthread_sigmask_patched(int how, const sigset_t *set, sigset_t *oset) {
    int ret = pthread_sigmask(how, set, oset);
    if (ret == EINVAL) {
        return pthread_sigmask_android16(how, set, oset);
    }
}
/* more signal.c code here... */

Additionally, we also change the 2 methods in signal.c that uses pthread_sigmask to use the patched version instead:


static void uv__signal_block_and_lock(sigset_t* saved_sigmask) {
    sigset_t new_mask;
    if (sigfillset(&new_mask))
        abort();
    // Code was changed here in order to fix android API <= 15 broken pthread_sigmask issue
    // original code called directly pthread_sigmask
    if (pthread_sigmask_patched(SIG_SETMASK, &new_mask, saved_sigmask))
        abort();
    if (uv__signal_lock())
        abort();
}
static void uv__signal_unlock_and_unblock(sigset_t* saved_sigmask) {
    if (uv__signal_unlock())
        abort();
    // Code was changed here in order to fix android API <= 15 broken pthread_sigmask issue
    // original code called directly pthread_sigmask
    if (pthread_sigmask_patched(SIG_SETMASK, saved_sigmask, NULL))
        abort();
}

Compiling and trying again to run node.js…and guess what? node starts as expected, no crashes, and everything seems to work fine!

Pretty miraculously, this was everything needed in order to make node.js run on older Android versions!

Building Node.js for Android

The good news is that Node.js does run on Android. The bad news is that at least at the time I’m writing this the build process requires a few extra steps. Nothing too scary though. See below for details.

Building Node.js for Android

  1. Go find a Linux machine or maybe a Mac.

    These instructions don’t currently work on Windows due to issues with the sh scripts being used. Yes, I did try the scripts in MINGW32 and no it didn’t work.

  2. Go download the Android NDK.

    Which NDK to download does take a bit of attention. Most Android devices today are 32 bit so I want the Platform (32-bit target). But my Linux OS (Elementary OS) is 64 bit so I want Linux 64-bit (x86) under Platform (32-bit target).

  3. After downloading the NDK unzip it.

    Let’s assume you put the NDK into ~/android-ndk-r10b.

  4. Go clone node.

    Let’s assume you put that into ~/node. I am running these instructions off master branch.

  5. Check that you have all of node’s dependencies as listed here

    I believe any modern Linux distro will have all of these already but just in case I decided to include the link.

  6. Go edit ~/node/android-configure and change ’arm-linux-androideabi-4.7’ to instead be ’arm-linux-androideabi-4.8.

    This is the pull request that added basic Android support to Node. It contains some instructions. The first instruction will set up the build environment for Android. But the set up script is designed for an older version of the Android NDK. So we need to update it. Specifically 4.7 is apparently not supported by NDK 10 so I switched it to 4.8 which is. I decided to leave platform=android-9 for no particularly good reason.

  7. Run from inside of ~/node directory the command “source ./android-configure ~/android-ndk-r10b”
  8. Now go to ~/node/android-toolchain/bin and issue the command “mv python2.7 oldpython2.7 && ln -s /usr/bin/python2.7 python2.7”

    The NDK appears to ship with its own version of Python 2.7 that doesn’t support a library (bz2) that is needed by files in the NDK. In any sane world this just means that the NDK is broken but I’m sure there is some logic here. This bug was reported to Node (since it breaks Node’s support of Android) but they responded that this is an NDK issue so Google should deal with it. But if we want to build we have to get connected to a version of Python that does support bz2. That’s what we did above. We linked the main version of Python (which any sane Linux distro will use) with the NDK so it will use that and hence support bz2.

  9. Now go to ~/node and issue ’make’

    The actual instructions from the checkin say to run ’make -j8’ which enables parallel capabilities in Make. Apparently the rule of thumb is to set the value after j to 2x the number of hardware threads available on the machine.

Using Node.js on Android via ADB

Eventually I’ll write up an AAR that just wraps all the Node stuff and provides a standard API for launching node and feeding it a script. But that isn’t my current priority so instead I need to just get node onto my device and play with it.

  1. Issue the command “adb push ~/node/out/Release /data/local/tmp/Release”
    • There is a step I’m skipping here. I actually do my development on Windows. So I copy the Release folder from my Linux VM (via Virtualbox) and then use the linked drive to move it to my Windows box. So in fact my adb push command above isn’t from the Linux location but my Windows location.
    • The out/Release folder contains all the build artifacts for Node. Of this mess I suspect only the node executable is actually needed. But for the moment I’m going to play it safe and just move everything over.
    • The reason for putting the node materials into /data/local/tmp/Release is because /data/local/tmp is one of the few areas where we can execute the chmod command in the next step and make Node executable. But when we wrap this thing up in an AAR we can actually use the setExecutable function instead.
  2. Issue “adb shell”. Once in the shell issue “chmod 700 /data/local/tmp/Release/node”
  3. I then issued an ’adb push’ for a simple hello world node program I have that I put inside of /data/local/tmp
    • I used “Hello HTTP” from http://howtonode.org/hello-node
  4. Then I went in via “adb shell” and ran “/data/local/tmp/Release/node helloworld.js”
    • And yes, it worked! I even tested it by going to the browser on the phone and navigating to http://localhost:8000.
  5. To kill things I just ctrl-c which does kill the adb shell but also the node app. Good enough for now.

What about NPM?

In theory one should be able to use NPM on the Linux box and then just move the whole thing over to Android and run it there. But this only works if none of the dependencies use an add-on. An add-on requires compiling C code into a form Android can handle. It looks like NPM wants to support making this happen but so far I haven’t found the right voodoo. So I’m still investigating.

Faster Web Development With Emmet

Emmet, previously known as Zen Coding, is the most productive and time-saving text-editor plugin you will ever see. By instantly expanding simple abbreviations into complex code snippets, Emmet can turn you into a more productive developer.

How Does It Work?

Let’s face it: writing HTML code takes time, with all of those tags, attributes, quotes, braces, etc. Of course, most text editors have code completion, which helps a lot, but you still have to do a lot of typing. Emmet instantly expands simple abbreviations into complex code snippets.

HTML Abbreviations

Initializers

Getting started with a new HTML document takes less than a second now. Just type ! or html:5, hit “Tab,” and you’ll see an HTML5 doctype with html, head and body tags to jumpstart your application.

  • html:5 or ! for an HTML5 doctype
  • html:xt for an XHTML transitional doctype
  • html:4s for an HTML4 strict doctype
Easily Add Classes, IDs, Text and Attributes

Because Emmet’s syntax for describing elements is similar to CSS selectors, getting used to it is very easy. Try mixing an element’s name (e.g. p ) with an identifier (e.g. p#description ).

Also, you can combine classes and IDs. For example, p.bar#foo will output this:

<p class="bar" id="foo"></p>

Now let’s see how to define content and attributes for your HTML elements. Curly brackets are used for content. So, h1{foo} will produce this:

<h1>foo</h1>

And square brackets are used for attributes. So, a[href=#] will generate this:

<a href="#"></a>
NESTING

By nesting abbreviations, you can build a whole page using just one line of code. First, the child operator, represented by >, allows you to nest elements. The sibling operator, represented by +, lets you place elements near each other, on the same level. Finally, the new climb-up operator, represented by ^, allows you to climb up one level in the tree. So p>span^p will generate this:

<p><span></span></p><p></p>
GROUPING

To effectively take advantage of nesting without turning them into a confusing mess of operators, you’ll need to group some pieces of code. It’s like math — you just need to use parentheses around certain pieces. For example, (.foo>h1)+(.bar>h2) will output this:


    <div class="foo">
    <h1></h1>
    </div>
    <div class="bar">
    <h2></h2>
    </div>
IMPLICIT TAG NAMES

To declare a tag with a class, just type div.item, and then it will generate

<div class="item"></div>

In the past, you could omit the tag name for a div; so, you just had to type .item and it would generate <div class="item"></div>. Now Emmet is more intelligent. It looks at the parent tag name every time you expand the abbreviation with an implicit name. So, if you declare .item inside of a <ul>, it will generate <li class="item"></li> instead of <div class="item"></div>.

Here’s a list of all implicit tag names:

  • li for ul and ol
  • tr for table, tbody, thead and tfoot
  • td for tr
  • option for select and optgroup
MULTIPLICATION

You can define how many times an element should be outputted by using the * operator. So, ul>li*3 will produce:


    <ul>
    <li></li>
    <li></li>
    <li></li>
    </ul>
NUMBERING

What about mixing the multiplication feature with some item numbering? Just place the $ operator in the element’s name, the attribute’s name or the attribute’s value to output the number of currently repeated elements. If you write ul>li.item$*3, it will output:


    <ul>
    <li class="item1"></li>
    <li class="item2"></li>
    <li class="item3"></li>
    </ul>

CSS Abbreviations

VALUES

Emmet is about more than just HTML elements. You can inject values directly into CSS abbreviations, too. Let’s say you want to define a width. Type w100, and it will generate:

width: 100px;

Pixel is not the only unit available. Try running h10p+m5e, and it will output:


    height: 10%;
    margin: 5em;

Here’s a list with a few aliases:

  • p → %
  • e → em
  • x → ex
EXTRA OPERATOR

You already know many intuitive abbreviations, such as @f, which produces:


    @font-face {
    font-family:;
    src:url();
    }

Some properties — such as background-image, border-radius, font, @font-face, text-outline, text-shadow — have some extra options that you can activate by using the + sign. For example, @f+ will output:


    @font-face {
    font-family: 'FontName';
    src: url('FileName.eot');
    src: url('FileName.eot?#iefix') format('embedded-opentype'),
    url('FileName.woff') format('woff'),
    url('FileName.ttf') format('truetype'),
    url('FileName.svg#FontName') format('svg');
    font-style: normal;
    font-weight: normal;
    }
FUZZY SEARCH

The CSS module uses fuzzy search to find unknown abbreviations. So, every time you enter an unknown abbreviation, Emmet will try to find the closest snippet definition. For example, ov:h and ov-h and ovh and oh will generate the same:

overflow: hidden;
VENDOR PREFIXES

CSS3 is awesome, but those vendor prefixes are a real pain for all of us. Well, not anymore — Emmet has abbreviations for them, too. For example, the trs abbreviation will expand to:


    -webkit-transform: ;
    -moz-transform: ;
    -ms-transform: ;
    -o-transform: ;
    transform: ;

You can also add prefixes to any kind of element. You just need to use the – prefix. So, -super-foo will expand to:


    -webkit-super-foo: ;
    -moz-super-foo: ;
    -ms-super-foo: ;
    -o-super-foo: ;
    super-foo: ;

What if you don’t want all of those prefixes? No problem. You can define exactly which browsers to support. For example, -wm-trf will output:

-webkit-transform: ;
    -moz-transform: ;
    transform: ;
  • w → -webkit-
  • m → -moz-
  • s → -ms-
  • o → -o-
GRADIENTS

Speaking of annoying CSS3 features, we cannot forget gradients. Those long definitions with different notations can now be easily replaced with a concise, bulletproof abbreviation. Type lg(left, #fff 50%, #000), and the output will be:


    background-image: -webkit-gradient(linear, 0 0, 100% 0, color-stop(0.5, #fff), to(#000));
    background-image: -webkit-linear-gradient(left, #fff 50%, #000);
    background-image: -moz-linear-gradient(left, #fff 50%, #000);
    background-image: -o-linear-gradient(left, #fff 50%, #000);
    background-image: linear-gradient(left, #fff 50%, #000);

Extras

LOREM IPSUM

Forget about those third-party services that generate “Lorem ipsum” text. Now you can do that right in your editor. Just use the lorem or lipsum abbreviations. You can specify how many words to generate. For instance, lorem10 will output:

Lorem ipsum dolor sit amet, consectetur adipisicing elit. Libero delectus.

Also, lorem can be chained to other elements. So, p*3>lorem5 will generate:


    <p>Lorem ipsum dolor sit amet.</p>
    <p>Voluptates esse aliquam asperiores sunt.</p>
    <p>Fugiat eaque laudantium explicabo omnis!</p>

Customization

Emmet offers a wide range of tweaks that you can use to fine-tune your plugin experience. There are three files you can edit to do this:

  • To add your own or to update an existing snippet, edit snippets.json.
  • To change the behavior of Emmet’s filters and actions, try editing preferences.json.
  • To define how generated HTML or XML should look, edit syntaxProfiles.json.

And A Lot More!

This is just the beginning. Emmet has a lot of other cool features, such as encoding and decoding images to data:URL, updating image sizes and incrementing and decrementing numbers.

An Open Source API For The Android Market

Introduction

The Android Market, now “Play”, is getting bigger and bigger. The result is there are too many applications that couldn’t be easily discovered by all the users. It could be a good idea to have an application which matches our interests and recommend applications that could be interested for us.

The problem behind is there is not an official API which the developers can use to access the Android Market. The good news is there is an open-source API, which seems to work.

http://code.google.com/p/android-market-api/

This API offers methods to search an App by name, to get the comments, to get the screencasts and even the icon of a specific application.

This post will demonstrate how to install a ruby wrapper over this project, which allow the users to use this API from the terminal. The unique problem is that not all the functions has been ported.

Install the jRuby

Actually the stable version of jRuby is 1.6.7.2, which could be found here:
http://jruby.org/download
Download the file depending on your Operation System and install it. In my case I have install it in a Mac OS, which the installation process was open the file and press several time “Next”.

Install json-jruby

The json-jruby gem must be downloaded, even when the result has to be in XML format.
Download the last json-jruby file from:
http://rubygems.org/gems/json-jruby
Open the terminal
Go to the folder where the file has been downloaded
Type the follow command to install it:

sudo gem install json-jruby

The terminal will ask for the password of your user. Enter it.

Install Supermarket

The project supermarket is the Android Market API Ruby Wrapper project created by jberkel which could be found here:
https://github.com/jberkel/supermarket
Open the terminal
Download the project using git

git clone https://github.com/jberkel/supermarket.git

Go to the folder where the project is
Type the follow command to install it

sudo jruby -S gem install supermarket

The terminal will ask for the password of your user. Enter it.

Install jsonpretty (Optional)

Json Pretty is a program which by give a json string, it format the string and returns a legible output. Because the result from Supermarket could be quite hard to read, it is recommendable to install it.

sudo gem install jsonpretty

The terminal will ask for the password of your user. Enter it.

Host Widgets In Android Application

Tutorial on how to using android widgets in your application, We’re going to learn how to add/remove and reattach widgets after reboot.

Initialization

You start by creating two objects. The first is an AppWidgetManager, which will give you the data you need about installed widgets. The second one is an AppWidgetHost, which will keep in memory your widget instances. Latter, your app will handle only the view that will draw the widget:


_appWidgetManager = AppWidgetManager.getInstance(_activity);
_homeWidgetHost = new AppWidgetHost(_activity, R.id.APPWIDGET_HOST_ID);

Selecting the Widget

You start by asking to the AppWidgetHost to allocate resources for a widget instance. It will return an ID for that. Then, you need to start an activity to let the user select which widget he wants to add to your app. You need to give this ID to the activity and stored in persistent storage to add selected widget again to host after system reboot.


// Class HomeWidgetManager.java implements View.OnLongClickListener
private final Activity _activity;
private final AppWidgetManager _appWidgetManager;
private final AppWidgetHost _homeWidgetHost;
private final ViewGroup _widgetContainer;
private int _widgetId;

public HomeWidgetManager(Activity activity){
    _widgetId = -1;
    _activity = activity;
    _widgetContainer = (ViewGroup) _activity.findViewById(R.id.homeClockContainer);
    _homeWidgetHost = new AppWidgetHost(_activity, R.id.APPWIDGET_HOST_ID);
    _appWidgetManager = AppWidgetManager.getInstance(_activity);
    _homeWidgetHost.startListening();
}
@Override
public boolean onLongClick(View v) {
    selectWidget();
    return true;
}
public void selectWidget() {
    int appWidgetId = _homeWidgetHost.allocateAppWidgetId();
    Intent pickIntent = new Intent(AppWidgetManager.ACTION_APPWIDGET_PICK);
    pickIntent.putExtra(AppWidgetManager.EXTRA_APPWIDGET_ID, appWidgetId);
    addEmptyData(pickIntent);
    _activity.startActivityForResult(pickIntent, R.id.REQUEST_PICK_APPWIDGET);
}
private void addEmptyData(Intent pickIntent) {
    ArrayList<AppWidgetProviderInfo> customInfo = new ArrayList<AppWidgetProviderInfo>();
    pickIntent.putParcelableArrayListExtra(AppWidgetManager.EXTRA_CUSTOM_INFO, customInfo);
    ArrayList<Bundle> customExtras = new ArrayList<Bundle>();
    pickIntent.putParcelableArrayListExtra(AppWidgetManager.EXTRA_CUSTOM_EXTRAS, customExtras);
}

Unfortunately, any kind of software has bugs, and here is one of the Android SDK. The Widget API supports that you merge custom widgets of your application with the installed ones. But if you don’t add anything, the Activity that shows the list of widgets to the user crashes with a NullPointerException. The addEmptyData() method above adds some dummy data to avoid this bug. More on this bug here. If you want to add a custom widget, start looking at this point of the AHSSC.

Configuring the Widget

If the user successfully selects a widget from the list (he didn’t pressed “back”), it will return an OK to you as an activity result. The data for this result contains the widget ID. Use it to retrieve the AppWidgetProviderInfo to check if the widget requires any configuration (some widgets does need). If it requires, you need to launch the activity to configure the widget. If not, jump to the next step.


// Your Activity Class
@Override
protected void onActivityResult(int requestCode, int resultCode, Intent data) {
    if(requestCode == R.id.REQUEST_PICK_APPWIDGET || requestCode == R.id.REQUEST_CREATE_APPWIDGET){
        _homeWidgetManager.onActivityResult(requestCode, resultCode, data);
    }
}

// Class HomeWidgetManager.java
public void onActivityResult(int requestCode, int resultCode, Intent data) {
    if (resultCode == Activity.RESULT_OK ) {
        if (requestCode == R.id.REQUEST_PICK_APPWIDGET) {
            configureWidget(data);
        }
        else if (requestCode == R.id.REQUEST_CREATE_APPWIDGET) {
            createWidget(data);
        }
    }
    else if (resultCode == Activity.RESULT_CANCELED && data != null) {
        int appWidgetId = data.getIntExtra(AppWidgetManager.EXTRA_APPWIDGET_ID, -1);
        if (appWidgetId != -1) {
            _homeWidgetHost.deleteAppWidgetId(appWidgetId);
        }
    }
}

private void configureWidget(Intent data) {
    Bundle extras = data.getExtras();
    int appWidgetId = extras.getInt(AppWidgetManager.EXTRA_APPWIDGET_ID, -1);
    AppWidgetProviderInfo appWidgetInfo = _appWidgetManager.getAppWidgetInfo(appWidgetId);
    if (appWidgetInfo.configure != null) {
        Intent intent = new Intent(AppWidgetManager.ACTION_APPWIDGET_CONFIGURE);
        intent.setComponent(appWidgetInfo.configure);
        intent.putExtra(AppWidgetManager.EXTRA_APPWIDGET_ID, appWidgetId);
        _activity.startActivityForResult(intent, R.id.REQUEST_CREATE_APPWIDGET);
    } else {
        createWidget(data);
    }
}

Creating and Adding it to Your Views

Now is time to create the widget itself. You will use the Widget ID and the AppWidgetProviderInfo to ask to the AppWidgetHost “could you please create a view of this widget for me?“. It will return an AppWidgetHostView which is a derived class from View. This one you can handle as any other view from the Framework.


// Class HomeWidgetManager.java
public void createWidget(Intent data) {
    Bundle extras = data.getExtras();
    int appWidgetId = extras.getInt(AppWidgetManager.EXTRA_APPWIDGET_ID, -1);
    if(appWidgetId < 0){
        return;
    }

    // Note : Here You Must Save appWidgetId For Future Use Otherwise You Cant Reattach Widget After Reboot

    AppWidgetProviderInfo appWidgetInfo = _appWidgetManager.getAppWidgetInfo(appWidgetId);
    AppWidgetHostView hostView = _homeWidgetHost.createView(_activity, appWidgetId, appWidgetInfo);
    hostView.setAppWidget(appWidgetId, appWidgetInfo);
    _widgetContainer.addView(hostView);
}

Updating

The widget is now working, but is not being updated by your app. If the widget is a clock, it will be stuck at the time you added it. To register the widget to receive the events it needs, call startListening() on the AppWidgetHost. To avoid wasting battery with unnecessary updates while your app is not visible, call it during the onStart() method of your activity, and call stopListening() during the onStop() method.


// Class HomeWidgetManager.java
public void startListener(){
    _homeWidgetHost.startListening();
}

public void stopListener(){
    _homeWidgetHost.stopListening();
}

// Activity Class
@Override
protected void onStart() {
    super.onStart();
    _homeWidgetManager.startListener();
}
@Override
protected void onStop() {
    super.onStop();
    _homeWidgetManager.stopListener();
}

Releasing the Widget

The widget should be working now. But if you want to remove the widget, you need to ask to the AppWidgetHost to release it. If you do not release it, you’ll get a memory leak (your app will consume unnecessary memory).


// Class HomeWidgetManager.java
public void removeWidget(AppWidgetHostView hostView) {
    _homeWidgetHost.deleteAppWidgetId(hostView.getAppWidgetId());
    _widgetContainer.removeView(hostView);
}

Reattaching the Widgets

To reattach selected widget all you need is appWidgetId assigned to the widget.


public void restoreWidget(){
    if(_widgetId < 0){
        return;
    }
    AppWidgetProviderInfo appWidgetInfo = _appWidgetManager.getAppWidgetInfo(_widgetId);
    AppWidgetHostView hostView = _homeWidgetHost.createView(_activity, _widgetId, appWidgetInfo);
    hostView.setAppWidget(_widgetId, appWidgetInfo);
    _widgetContainer.addView(hostView);
}

An Introduction to the log4net logging library

There are a three parts to log4net. There is the configuration, the setup, and the call. The configuration is typically done in the app.config or web.config file. We will go over this in depth below. If you desire more flexibility through the use of a separate configuration file, see the section titled “Getting Away from app.config”. Either way you choose to store the configuration information, the code setup is basically a couple of lines of housekeeping that need to be called in order to set up and instantiate a connection to the logger. Finally, the simplest part is the call itself. This, if you do it right, is very simple to do and the easiest to understand.

Logging Levels

There are seven logging levels, five of which can be called in your code. They are as follows (with the highest being at the top of the list):

  1. OFF – nothing gets logged (cannot be called)
  2. FATAL
  3. ERROR
  4. WARN
  5. INFO
  6. DEBUG
  7. ALL – everything gets logged (cannot be called)

These levels will be used multiple times, both in your code as well as in the config file. There are no set rules on what these levels represent (except the first and last).

The Configuration

The standard way to set up a log4net logger is to utilize either the app.config file in a desktop application or the web.config file in a web application. There are a few pieces of information that need to be placed in the config file in order to make it work properly with log4net. These sections will tell log4net how to configure itself. The settings can be changed without re-compiling the application, which is the whole point of a config file.

Root

You need to have one root section to house your top-level logger references. These are the loggers that inherit information from your base logger (root). The only other thing that the root section houses is the minimum level to log. Since everything inherits from the root, no appenders will log information below that specified here. This is an easy way to quickly control the logging level in your application. Here is an example with a default level of INFO (which means DEBUG messages will be ignored) and a reference to two appenders that should be enabled under root:


<root>
    <level value="INFO"/>
    <appender-ref ref="FileAppender"/>
    <appender-ref ref="ConsoleAppender" />
</root>

Additional Loggers

Sometimes you will want to know more about a particular part of your application. log4net anticipated this by allowing you to specify additional logger references beyond just the root logger. For example, here is an additional logger that I have placed in our config file to log to the console messages that occur inside the OtherClass class object:


<logger name="Log4NetTest.OtherClass">
    <level value="DEBUG"/>
    <appender-ref ref="ConsoleAppender"/>
</logger>

Note that the logger name is the full name of the class including the namespace. If you wanted to monitor an entire namespace, it would be as simple as listing just the namespace you wanted to monitor. I would recommend against trying to re-use appenders in multiple loggers. It can be done, but you can get some unpredictable results.

ConfigSections

In a config file where there will (potentially) be more information stored beyond just the log4net configuration information, you will need to specify a section to identify where the log4net configuration is housed. Here is a sample section that specifies that the configuration information will be stored under the XML tag “log4net”:


<configSections>
    <section name="log4net"
             type="log4net.Config.Log4NetConfigurationSectionHandler, log4net"/>
</configSections>

Appender (General)

An appender is the name for what logs the information. It specifies where the information will be logged, how it will be logged, and under what circumstances the information will be logged. While each appender has different parameters based upon where the data will be going, there are some common elements. The first is the name and type of the appender. Each appender must be named (anything you want) and have a type assigned to it (specific to the type of appender desired). Here is an example of an appender entry:


<appender name="ConsoleAppender" type="log4net.Appender.ConsoleAppender"/>

Layout

Inside of each appender must be a layout section. This may be a bit different depending on the type of appender being used, but the basics are the same. You need a type that specifies how the data will be written. There are multiple options, but the one that I suggest you use is the pattern layout type. This will allow you to specify how you want your data written to the data repository. If you specify the pattern layout type, you will need a sub-tag that specifies a conversion pattern. This is the pattern by which your data should be written to the data repository. I will give a more detailed description of your options for the conversion patterns, but for now, here is an example of the layout tag with the pattern layout specified:


<layout type="log4net.Layout.PatternLayout">
    <conversionPattern value="%date [%thread] %-5level %logger [%ndc] - %message%newline"/>
</layout>

Conversion Patterns

As I mentioned above, the conversion pattern entry is used for the pattern layout to tell the appender how to store the information. There are many different keywords that can be used in these patterns, as well as string literals. Here I will specify what I think are the most useful and important ones. The full list can be found in the log4net documentation.

  • %date Outputs the date using the local time zone information. This date can be formatted using the curly braces and a layout pattern such as %date{MMMM dd, yyyy HH:mm:ss, fff} to output the value of “January 01, 2011 14:15:43, 767”. However, it is suggested that you use one of the log4net date formatters (ABSOLUTE, DATE, or ISO8601) since they offer better performance.
  • %utcdate This is the same as the %date modifier, but it outputs in universal time. The modifiers for date/time all work the same way.
  • %exception If an exception is passed in, it will be entered and a new line will be placed after the exception. If no exception is passed in, this entry will be ignored and no new line will be put in. This is usually placed at the end of a log entry, and usually a new line is placed before the exception as well.
  • %level This is the level you specified for the event (DEBUG, INFO, WARN, etc.).
  • %message This is the message you passed into the log event.
  • %newline This is a new line entry. Based upon the platform you are using the application on, this will be translated into the appropriate new line character(s). This is the preferred method to enter a new line and it has no performance problems compared to the platform-specific operators.
  • %timestamp This is the number of milliseconds since the start of the application.
  • %thread This will give you the name of the thread that the entry was made on (or the number if the thread is not named).

Beyond these are a few more that can be very useful but should be used with caution. They have negative performance implications and should be used with caution. The list includes:

  • %identity This is the user name of the current user using the Principal.Identity.Name method.
  • %location Especially useful if you are running in Debug mode, this tells you where the log method was called (line number, method, etc.). However, the amount of information will decrease as you operate in Release mode depending on what the system can access from the compiled code.
  • %line This is the line number of the code entry (see the note above on the location issues).
  • %method This is the method that calls the log entry (see the note above on the location issues).
  • %username This outputs the value of the WindowsIdentity property.

You may notice that some config files have letters instead of names. These have been depreciated in favor of whole word entries like I have specified above. Also, while I won’t cover it in depth here, note that each of these entries can be formatted to fit a certain width. Spaces can be added (to either side) and values can be truncated in order to fit inside of fixed-width columns. The basic syntax is to place a numeric value or values between the % sign and the name. Here are the modifiers:

  • X Specifies the minimum number of characters. Anything that has fewer characters will have spaces placed on the left of the value to equal 20 characters including the message. For example, %10message will give you ” hi”.
  • -X Same as above, only the spaces will be placed on the right. For example, %-10message will give you “hi “.
  • .X Specifies the maximum number of characters. The important thing to note is that this will truncate the beginning of the string, not the end. For example, %.10message will give me “rror entry” if the string passed in was “Error entry”.

You can put all of this together with something like this: "%10.20message", which would specify that if the message isn’t ten characters long, put spaces on the left to fill it out to ten characters, but if the message is more than 20 characters long, cut off the beginning to make it only 20 characters.

Filters

Filters are another big part of any appender. With a filter, you can specify which level(s) to log and you can even look for keywords in the message. Filters can be mixed and matched, but you need to be careful when doing so. When a message fits inside the criteria for a filter, it is logged and the processing of the filter is finished. This is the biggest gotcha of a filter. Therefore, ordering of the filters becomes very important if you are doing a complex filter.

StringMatchFilter

The string match filter looks to find a specific string inside of the information being logged. You can have multiple string match filters specified. They work like OR statements in a query. The filter will look for the first string, then the second, etc., until a match is found. However, the important thing to note here is that not finding a match to a specified string does not exclude an entry (since it may proceed to the next string match filter). This means, however, that you may encounter a time where there are no matches found. In that case, the default action is to log the entry. So, at the end of a string match filter set, it is necessary to include a deny all filter (see below) to deny the entry from being logged if a match has not been made. Here is an example of how to filter for entries that have test in their message:


<filter type="log4net.Filter.StringMatchFilter">
    <stringToMatch value="test" />
</filter>

LevelRangeFilter

A level range filter tells the system to only log entries that are inside of the range specified. This range is inclusive, so in the below example, events with a level of INFO, WARN, ERROR, or FATAL will be logged, but DEBUG events will be ignored. You do not need the deny all filter after this entry since the deny is implied.


<filter type="log4net.Filter.LevelRangeFilter">
    <levelMin value="INFO" />
    <levelMax value="FATAL" />
</filter>

LevelMatchFilter

The level match filter works like the level range filter, only it specifies one and only one level to capture. However, it does not have the deny built into it so you will need to specify the deny all filter after listing this filter.


<filter type="log4net.Filter.LevelMatchFilter">
    <levelToMatch value="ERROR"/>
</filter>

DenyAllFilter

Here is the entry that, if forgotten, will probably ensure that your appender does not work as intended. The only purpose of this entry is to specify that no log entry should be made. If this were the only filter entry, then nothing would be logged. However, its true purpose is to specify that nothing more should be logged (remember, anything that has already been matched has been logged).


<filter type="log4net.Filter.DenyAllFilter" />

Appenders

Each type of appender has its own set of syntax based upon where the data is going. The most unusual ones are the ones that log to databases. I will list a few of the ones that I think are most common. However, given the above information, you should be able to use the examples given online without any problems. The log4net site has some great examples of the different appenders. As I have said before, I used the log4net documentation extensively and this area was no exception. I usually copy their example and then modify it for my own purposes.

Console Appender

I use this appender for testing usually, but it can be useful in production as well. It writes to the output window, or the command window if you are using a console application. This particular filter outputs a value like “2010-12-26 15:41:03,581 [10] WARN Log4NetTest.frmMain – This is a WARN test.” It will include a new line at the end.


<appender name="ConsoleAppender" type="log4net.Appender.ConsoleAppender">
    <layout type="log4net.Layout.PatternLayout">
        <conversionPattern value="%date{ABSOLUTE} [%thread] %level %logger - %message%newline"/>
    </layout>
    <filter type="log4net.Filter.StringMatchFilter">
        <stringToMatch value="test" />
    </filter>
    <filter type="log4net.Filter.DenyAllFilter" />
</appender>

File Appender

This appender will write to a text file. The big differences to note here are that we have to specify the name of the text file (in this case, it is a file named mylogfile.txt that will be stored in the same location as the executable), we have specified that we should append to the file (instead of overwriting it), and we have specified that the FileAppender should use the Minimal Lock which will make the file usable by multiple appenders.


<appender name="FileAppender" type="log4net.Appender.FileAppender">
    <file value="mylogfile.txt" />
    <appendToFile value="true" />
    <lockingModel type="log4net.Appender.FileAppender+MinimalLock" />
    <layout type="log4net.Layout.PatternLayout">
        <conversionPattern value="%date [%thread] %level %logger - %message%newline" />
    </layout>
    <filter type="log4net.Filter.LevelRangeFilter">
        <levelMin value="INFO" />
        <levelMax value="FATAL" />
    </filter>
</appender>

Rolling File Appender

This is an appender that should be used in place of the file appender whenever possible. The purpose of the rolling file appender is to perform the same functions as the file appender but with the additional option to only store a certain amount of data before starting a new log file. This way, you won’t need to worry about the logs on a system filling up over time. Even a small application could overwhelm a file system given enough time writing to a text file if the rolling option were not used. In this example, I am logging in a similar fashion to the file appender above, but I am specifying that the log file should be capped at 10MB and that I should keep up to 5 archive files before I start deleting them (oldest gets deleted first). The archives will be named with the same name as the file, only with a dot and the number after it (example: mylogfile.txt.2 would be the second log file archive). The staticLogFileName entry ensures that the current log file will always be named what I specified in the file tag (in my case, mylogfile.txt).


<appender name="RollingFileAppender" type="log4net.Appender.RollingFileAppender">
    <file value="mylogfile.txt" />
    <appendToFile value="true" />
    <rollingStyle value="Size" />
    <maxSizeRollBackups value="5" />
    <maximumFileSize value="10MB" />
    <staticLogFileName value="true" />
    <layout type="log4net.Layout.PatternLayout">
        <conversionPattern value="%date [%thread] %level %logger - %message%newline" />
    </layout>
</appender>

ADO.NET Appender

Here is the tricky one. This specific example writes to SQL, but you can write to just about any database you want using this pattern. Note that the connectionType is basically a connection string, so modifying it is simple. The commandText specified is a simple query. You can modify it to any type of INSERT query that you want (or Stored Procedure). Notice that each parameter is specified below and mapped to a log4net variable. The size can be specified to limit the information placed into the parameter. This appender is a direct copy from the log4net example. I take no credit for it. I simply use it as an example of what can be done.

Quick note: If you find that your ADO.NET appender is not working, check the bufferSize value. This value contains the number of log statements that log4net will cache before writing them all to SQL. The example on the log4net website has a bufferSize of 100, which means you will probably freak out in testing when nothing is working. Change the bufferSize value to 1 to make the logger write every statement when it comes in.

For this example and more, go to the following URL: http://logging.apache.org/log4net/release/config-examples.html


<appender name="AdoNetAppender" type="log4net.Appender.AdoNetAppender">
    <bufferSize value="100" />
    <connectionType value="System.Data.SqlClient.SqlConnection, System.Data, Version=1.0.3300.0, Culture=neutral, PublicKeyToken=b77a5c561934e089" />
    <connectionString value="data source=[database server]; initial catalog=[database name];integrated security=false; persist security info=True;User ID=[user];Password=[password]" />
    <commandText value="INSERT INTO Log ([Date],[Thread],[Level],[Logger],[Message],[Exception]) VALUES (@log_date, @thread, @log_level, @logger, @message, @exception)" />
    <parameter>
        <parameterName value="@log_date" />
        <dbType value="DateTime" />
        <layout type="log4net.Layout.RawTimeStampLayout" />
    </parameter>
    <parameter>
        <parameterName value="@thread" />
        <dbType value="String" />
        <size value="255" />
        <layout type="log4net.Layout.PatternLayout">
            <conversionPattern value="%thread" />
        </layout>
    </parameter>
    <parameter>
        <parameterName value="@log_level" />
        <dbType value="String" />
        <size value="50" />
        <layout type="log4net.Layout.PatternLayout">
            <conversionPattern value="%level" />
        </layout>
    </parameter>
    <parameter>
        <parameterName value="@logger" />
        <dbType value="String" />
        <size value="255" />
        <layout type="log4net.Layout.PatternLayout">
            <conversionPattern value="%logger" />
        </layout>
    </parameter>
    <parameter>
        <parameterName value="@message" />
        <dbType value="String" />
        <size value="4000" />
        <layout type="log4net.Layout.PatternLayout">
            <conversionPattern value="%message" />
        </layout>
    </parameter>
    <parameter>
        <parameterName value="@exception" />
        <dbType value="String" />
        <size value="2000" />
        <layout type="log4net.Layout.ExceptionLayout" />
    </parameter>
</appender>

The Code

Once you have a reference to the log4net DLL in your application, there are three lines of code that you need to know about. The first is a one-time entry that needs to be placed outside of your class. I usually put it right below my using statements in the Program.cs file. You can copy and paste this code since it will probably never need to change (unless you do something unusual with your config file). Here is the code:


[assembly: log4net.Config.XmlConfigurator(Watch = true)]

The next entry is done once per class. It creates a variable (in this case called “log”) that will be used to call the log4net methods. This code is also code that you can copy and paste (unless you are using the Compact Framework). It does a System.Reflection call to get the current class information. This is useful because it allows us to use this code all over but have the specific information passed into it in each class. Here is the code:


private static readonly log4net.ILog log = log4net.LogManager.GetLogger(System.Reflection.MethodBase.GetCurrentMethod().DeclaringType);

The final code piece is the actual call to log some piece of information. This can be done using the following code:


log.Info("Info logging");

Notice that you can add an optional parameter at the end to include the exception that should be logged. Include the entire exception object if you want to use this option. The call is very similar, and it looks like this:


log.Error("This is my error", ex);

ex is the exception object. Remember that you need to use the %exception pattern variable in your appender to actually capture this exception information.

Logging Extra Data

Using the basic configuration in log4net usually includes enough information for a typical application. However, sometimes you want to record more information in a standard way. For example, if you use the ADO.NET appender, you may want to add a field for application user name instead of just including it in the message field. There isn’t a conversion pattern that matches up with the application user name. However, you can use the Context properties to specify custom properties that can be accessed in the appenders. Here is an example of how to set it up in code:


log4net.GlobalContext.Properties["testProperty"] = "This is my test property information";

There are a couple of things to notice. First, I named the property “testProperty”. I could have named it anything. However, be careful because if you use a name that is already in use, you may overwrite it. This leads into the second thing to note. I referenced the GlobalContext, but there are four contexts that can be utilized. They are based upon the threading. Global is available anywhere in the application where Thread, Logical Thread, and Event restrict the scope further and further. You can use this to store different information based upon the context of where the logger was called. However, if you have two properties with the same name, the one that is in the narrower scope will win. Looking at our first point again, we can see the issue that this might cause. If we declare a GlobalContext property that has the same property name as an existing ThreadContext, we may not see the property value we expect because of the existing value. For this reason, I would suggest developing your own naming scheme that will not conflict with anyone else’s names.

Here is an example of how to capture this property in our appender:


<layout type="log4net.Layout.PatternLayout">
    <conversionPattern value="%date{ABSOLUTE} [%thread] %level %logger - %message%newlineExtra Info: %property{                    testProperty}%newline%exception"/>
</layout>

For more information on the different Contexts, reference the log4net documentation on the topic here:
http://logging.apache.org/log4net/release/manual/contexts.html

Getting Away from app.config/web.config

You may come across a time when you want to use a separate file to store the log4net configuration information. In fact, you might find this to be the optimal way to store the configuration information, since you could keep copies of your different standard configurations on hand to drop into your projects. This could cut down on development time and allow you to standardize your logging information. To set this up, you need to change only two parts of your app. The first thing you need to do is save the configuration in a different file. The format will be the same, as will how it is laid out. The only thing that will really change in the layout is that it isn’t in the middle of your app.config or web.config file. The second change you need to make is in that one setup call in your application. You need to add information on where the file is, like so:


[assembly: log4net.Config.XmlConfigurator(ConfigFile = "MyStandardLog4Net.config", Watch = true)]

There is also the possibility of simply choosing a different extension for this file by using “ConfigFileExtension” instead of “ConfigFile” in the line above. If you do that, you need to name your config file to be your assembly name (including extension), and it needs to have the extension you specify. Here is an example with a more visual explanation:


[assembly: log4net.Config.XmlConfigurator(ConfigFileExtension = "mylogger", Watch = true)]

In the above example, if our application was test.exe, then the configuration file for log4net should be named text.exe.mylogger.

Config File Template

I have given you a blank template below. I have also labeled each section with which level it is in so that, in case the formatting doesn’t make it obvious, you know how each item relates to all the others up and down the tree.


<!--This is the root of your config file-->
<configuration> <!-- Level 0 -->
    <!--This specifies what the section name is-->
    <configSections> <!-- Level 1 -->
        <section name="log4net" type="log4net.Config.Log4NetConfigurationSectionHandler, log4net"/> <!-- Level 2 -->
    </configSections>
    <log4net> <!-- Level 1 -->
        <appender>  <!-- Level 2 -->
            <layout>  <!-- Level 3 -->
                <conversionPattern />  <!-- Level 4 -->
            </layout>
            <filter>  <!-- Level 3 -->
            </filter>
        </appender>
        <root> <!-- Level 2 -->
            <level /> <!-- Level 3 -->
            <appender-ref /> <!-- Level 3 -->
        </root>
        <logger> <!-- Level 2 -->
            <level /> <!-- Level 3 -->
            <appender-ref /> <!-- Level 3 -->
        </logger>
    </log4net>
</configuration>

ASP.NET MVC Localization

The goal of this post is to show how to get URL like this /{culture}/{Controller}/{Action}… in your application like /fa/Home/AboutUS

Custom Route Handlers

First of all we’ll need to extend standard MvcRouteHandler class. One class MultiCultureMvcRouteHandler for routes that will use culture in params and SingleCultureMvcRouteHandler class (will be used as a marker, no implementation changes)


public class MultiCultureMvcRouteHandler : MvcRouteHandler
{
    protected override IHttpHandler GetHttpHandler(RequestContext requestContext)
    {
        var culture = requestContext.RouteData.Values["culture"].ToString();
        var ci = new CultureInfo(culture);
        Thread.CurrentThread.CurrentUICulture = ci;
        Thread.CurrentThread.CurrentCulture = CultureInfo.CreateSpecificCulture(ci.Name);
        return base.GetHttpHandler(requestContext);
    }
}

In the overridden GetHttpHandler before calling it’s base implementation we just get “culture” param from RouteData collection, create CultureInfo object and set it to current thread current culture. So here is a place where we set culture and will not use Application_AcquireRequestState method in Global.asax


public class SingleCultureMvcRouteHandler : MvcRouteHandler {}

As I mention this class will be used only for marking some routes for case if you’ll need some routes to be culture independent.

Registering routes

Now lets go to Global.asax file where we have route registering method RegisterRoutes(). Right after last route mapping add foreach statement code snippet like in the following example.


public static void RegisterRoutes(RouteCollection routes)
{
    routes.IgnoreRoute("{resource}.axd/{*pathInfo}");

    routes.MapRoute(
    "Default", // Route name
    "{controller}/{action}/{id}", // URL with parameters
    new { controller = "Home", action = "Index", id = UrlParameter.Optional } // Parameter defaults
    );

    foreach (Route r in routes)
    {
        if (!(r.RouteHandler is SingleCultureMvcRouteHandler))
        {
            r.RouteHandler = new MultiCultureMvcRouteHandler();
            r.Url = "{culture}/" + r.Url;
            //Adding default culture
            if (r.Defaults == null)
            {
                r.Defaults = new RouteValueDictionary();
            }
            r.Defaults.Add("culture", Culture.fa.ToString());

            //Adding constraint for culture param
            if (r.Constraints == null)
            {
                r.Constraints = new RouteValueDictionary();
            }
            r.Constraints.Add("culture", new CultureConstraint(Culture.en.ToString(),
            Culture.fa.ToString()));
        }
    }
}

OK, lets go through this code… So for each route we first of all check whether its handler type is SingleCultureMvcRouteHandler or not… So if not we change RouteHandler property of the current route to MultiCulture one, add prefix to Url, add default culture and finally add constraint for culture param checking.


public class CultureConstraint : IRouteConstraint
{
    private string[] _values;
    public CultureConstraint(params string[] values)
    {
        this._values = values;
    }
    public bool Match(HttpContextBase httpContext,Route route,string parameterName,
    RouteValueDictionary values, RouteDirection routeDirection)
    {
        // Get the value called "parameterName" from the
        // RouteValueDictionary called "value"
        string value = values[parameterName].ToString();
        // Return true is the list of allowed values contains
        // this value.
        return _values.Contains(value);
    }
}

And enum of cultures


public enum Culture
{
    fa = 1,
    en = 2
}

Simple culture switching mechanism

For changing culture we’ll need following simple action which I placed in AccountController


public ActionResult ChangeCulture(Culture lang, string returnUrl)
{
    if (returnUrl.Length >= 3)
    {
        returnUrl = returnUrl.Substring(3);
    }
    return Redirect("/" + lang.ToString() + returnUrl);
}

and partial view with languages links – CultureSwitchControl.ascx


<%@ Control Language="C#" Inherits="System.Web.Mvc.ViewUserControl" %>
<%= Html.ActionLink("eng", "ChangeCulture", "Account",
    new { lang = (int)MvcLocalization.Helpers.Culture.en, returnUrl =
    this.Request.RawUrl }, new { @class = "culture-link" })%>
<%= Html.ActionLink("per", "ChangeCulture", "Account",
    new { lang = (int)MvcLocalization.Helpers.Culture.fa, returnUrl =
    this.Request.RawUrl }, new { @class = "culture-link" })%>

Single culture case

Finally, if we need some single culture route all we need to do is to set RouteHandler property to SingleCultureMvcRouteHandler like this


routes.MapRoute(
        "AboutRoute",
        "About",
        new { controller = "Home", action = "About"}
    ).RouteHandler = new SingleCultureMvcRouteHandler();

So, that’s it Localization with use of routing.